CHOCOLATE PANCAKES
Abagail and I had these for lunch today. Yum! Thought it would be good next time to try adding cinnamon.
2 cups bisquick
1/4 c sugar
2 T cocoa (next time I would sift - I get a big chunk in my pancake)
1 cup chocolate milk
1 tsp vanilla
2 eggs
CHOCOLATE PANCAKES
Everyone loved these! Tasted like a piece of cake.
Update: My family loved whole box yellow cake mix with 2-4 T cocoa powder and 1 1/2 cup chocolate chips. I put the chocolate chips in first and mixed with cake mix before adding milk.
Don't cook on cast iron skillet. Needs to be non stick.
2 cups cake mix (any kind would do)
1 cup milk
UPDATE: If doing this recipe as waffles add an egg and some oil or else they will crumble really bad. I also added some chocolate chunks and peanut butter chips that I dusted with flour first. Yum!
Monday, March 31, 2014
Sunday, March 23, 2014
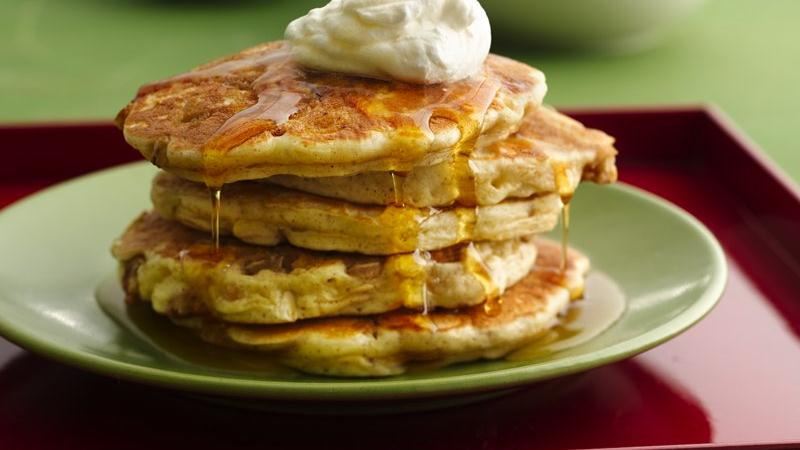
APPLE CRISP PANCAKES
Apple Crisp Pancakes
Apple crisp and pancakes rolled into one. Diced apples add chunky goodness to the Bisquick® batter and then before flipping, the pancakes get topped with a brown sugar-oatmeal streusel.
We all really liked these pancakes.
http://www.bettycrocker.com/recipes/apple-crisp-pancakes/b067f08b-a9d7-4a75-9187-c181741dc561
- Prep Time 15 min
- Total Time 25 min
- Servings 13
Ingredients
Streusel Topping
- 1/4
- cup plus 2 tablespoons packed brown sugar
- 1/4
- cup Gold Medal® all-purpose flour
- 1/4
- cup old-fashioned or quick-cooking oats
- 2
- tablespoons plus 2 teaspoons cold butter
Pancakes
- 2
- cups Original Bisquick® mix
- 1/2
- teaspoon ground cinnamon
- 1/4
- teaaspoon ground nutmeg
- 1
- cup peeled diced Granny Smith apple (1/4-inch)
- 1
- cup milk
- 2
- eggs
Toppings, If Desired
- Powdered sugar
- Real maple syrup
- Sweetened whipped cream
Directions
- 1In medium bowl, mix brown sugar, flour, oats, cinnamon and nutmeg. Cut in butter using pastry blender or fork until mixture is crumbly. Set aside.
- 2In large bowl, stir all pancake ingredients until well blended. Heat nonstick griddle to 350°F. or 12-inch skillet over medium-high heat. (To test griddle, sprinkle with a few drops of water. If bubbles jump around, heat is just right.) Brush lightly with vegetable oil or spray with cooking spray before heating to help prevent streusel from sticking to griddle.
- 3For each pancake, pour 1/4 cupful batter onto hot griddle. Sprinkle each pancake evenly with scant 2 tablesppons Streusel mixture. Cook 2 to 3 minutes or until bubbly on top and dry around edges. Turn; cook other side until light golden brown around edges about 1 minute to 1 minute 30 seconds. Scrape off griddle between batches of pancakes if necessary.
- 4To serve, serve pancakes Streusel side up and top as desired using any of the toppings listed.
Thursday, March 20, 2014
ROAST/SKIN GREEN CHILI PEPPERS
How to Skin Green Chili Peppers

You must remove the outer skin of green chili peppers to enjoy them. Each autumn throughout Texas, New Mexico and Colorado, chili roaster cages turn over a hot fire and fill the chilly air with the distinctive aroma of roasting peppers. The peppers are sold by the pound or in 10-lb. and 20-lb. burlap bags. Grocers and street vendors offer the service of roasting the peppers to loosen the outer skin. Buyers then take the peppers home and finish the process of removing the loosened skin. Chili season is a much awaited event, and people purchase enough chili for most of the year.
Other People Are Reading


Instructions
- 1Wash and dry the green chili peppers thoroughly.
- 2Turn the broiler in the oven on high.
- 3Place the green chili peppers side by side in a single layer on a cookie sheet.
- 4Roast the green chili peppers approximately three to four minutes on each side.
- 5Place the green chili peppers in a large container, cover it with plastic wrap and allow the green peppers to steam until cool.
- 6Peel the skins off of the peppers. It may be necessary to do so under running water for skins that are stubborn to remove. Wear rubber gloves and even safety glasses. Handling the peppers without gloves will irritate the skin, and gas from the green chili peppers can do the same to the eyes. Unconsciously touching the face or eyes will result in a serious burning sensation.
- 7Place the peppers in a plastic bag and freeze until ready for use.
- 1
Read more: http://www.ehow.com/how_7720108_skin-green-chili-peppers.html#ixzz2wX3Kfbtl
Monday, March 17, 2014
WHOLE GRAIN COOKIE DUNKERS
Whole Grain Cookie Dunkers - Half Batch!
We really liked. Perfect FHE treat.
http://yestoyum.com/2014/01/20/whole-grain-chocolate-chip-cookie-dunkers/

Whole grain chocolate chip oatmeal cookies that are made for milk! A fun twist on a classic treat.
Ingredients
- 1/2 cup old fashioned oats
- 3/4 cup whole wheat flour
- 1/2 teaspoon baking soda
- 1/4 teaspoon salt
- 6 tablespoons butter, softened
- 1/2 cup white sugar
- 2 tablespoons brown sugar
- 1 egg white
- 1 teaspoons vanilla
- 1/4 cup walnuts, chopped
- 1/2 cup mini chocolate chips
Instructions
- Preheat oven to 350 degrees.
- Mix the first four ingredients into a small bowl.
- In a separate bowl cream together butter, brown sugar, and white sugar. It's very important to use butter that is softened and not melted. Melted butter will give you flat cookies. Add egg whites and vanilla, mix until combined.
- Gradually add dry ingredients, stirring after each addition. The dough will be relatively thick. Stir in walnuts and chocolate chips. Let chill in the fridge for twenty minutes.
- Scoop out golf ball size balls of dough and form into flat bars. I did this by making a log shape and pressing the middle down. Bake for 8 minutes, or until edges of cookies are a light golden brown. I used a silicon baking sheet so your baking time may be a little shorter if you use a metal pan.
- Store in an airtight container.
Notes
Note that these cookies are modeled after a classic Chips Ahoy type texture. They definitely call for a glass of milk!
*I added 1/2 cup crushed bran flakes in one batch after seeing it in a Better Homes and Garden recipe. I liked the texture, but everyone else erred on the negative side. Feel free to add it as a mix in.
Saturday, March 15, 2014
PIZZA FACTORY BREADSTICKS
PIZZA FACTORY BREADSTICKS
We all loved these breadsticks. Liked that they didn't take very long to make. The kids thought it was so cool how big they were. I rolled them out on the big cutting board (backside). Then I folded it towards the top. I used costco seasoning (didn't have garlic salt). Think it would be even better with garlic salt.
http://barefootandbaking.blogspot.ca/2012/05/pizza-factory-breadsticks.html

When my husband and I lived in Provo, UT we LOVED going to the Pizza
Factory, we went for the breadsticks mainly, but their food was good
too! They make their breadsticks all twisted on tall dowels and serve
them in a big vase. So fun! So, when I spotted this recipe over at Six Sisters Stuff,
I just couldn't resist! I have made them a couple of times now and my
husband has declared them his new favorite! They are super yummy and
also super fast, bonus! Here is my take on them...
Pizza Factory Breadsticks
(15-20, depending on how fat you make them)
1 1/2 cups warm water
2 T sugar
1 T yeast
Let that sit for 5 minutes. Then add:
3 1/2 cups flour
1 t salt
To brush on top:
1/2 stick butter (1/4 cup), melted
garlic salt
Mix until smooth and then let rise for 10 minutes. Roll the dough into a
large square on a floured surface. Mix together the melted butter and
garlic salt and brush half of it onto the dough. Fold the dough in half
and cut into 15-20 strips (about 1 inch each). Twist each strip and
place on an UNGREASED cookie sheet. Let the twists sit for 15 -20
minutes to rise (I just let them rise while the oven is preheating).
Bake the breadsticks at 400 for 15-20 minutes or until golden brown.
As soon as they come out, brush the tops with the remaining garlic
butter.

Saturday, March 1, 2014
PIZZA CRUST AND SAUCE
This was really good. I didn't do her method of cooking, but liked how the crust tasted and LOVED the pizza sauce. I made the pizza sauce in the braun. Was able to get one round pizza and one cookie sheet pizza out of the sauce. I 1.5 the pizza crust recipe to make one round and one cookie sheet. Judi had given us two fresh mozzarella packages. They made the pizza a little bit wetter but it was good. We also did pepperoni, cheese, pepperoni and cheese, breakfast sausage with green peppers.
Homemade Pizza Sauce
This recipe is very adaptable so feel free to play around with the different seasonings and amounts. I usually forego all measuring utensils and just sprinkle in until it feels right.
INGREDIENTS
- 1 (14 1/2-ounce) can diced tomatoes, undrained
- 1 (6-ounce) can tomato paste
- 1 teaspoon sugar
- 1/2 teaspoon dried oregano
- 1/4 teaspoon garlic salt
- 1/2 teaspoon dried basil
- Pinch of crushed red pepper (didn't add)
DIRECTIONS
- Combine all ingredients in food processor or blender and blend until desired consistency. I leave mine slightly chunky. You can adjust the seasonings to taste. This recipe is open to interpretation. Use what you like, taste it along the way and it is sure to be delicious!
Homemade Pizza – New and Improved
INGREDIENTS
- 1 1/4 cups warm water
- 2 teaspoons instant yeast
- 2 tablespoons sugar
- 1 tablespoon honey
- 1 tablespoon olive oil
- 2 teaspoons salt
- 1 1/2 cups all-purpose flour
- 1 1/2 cups whole wheat flour
DIRECTIONS
- Make the dough the night before or early the morning on the day you want to make the pizza. In a large mixing bowl (or in the bowl of a stand mixer), mix the water, yeast, sugar, honey and oil. (If using active dry yeast, increase the amount of yeast to 2 3/4 teaspoons and proof the yeast in the water until foamy before mixing in the sugar, honey and oil.) Then mix in 1 cup flour and the salt. Continue mixing in all the remaining flour until you get a nice, soft dough. Knead until dough is soft and smooth, about 10 minutes by hand or 5 minutes with a stand mixer.
- Shape the dough into a ball and place in a lightly greased bowl and cover tightly (with a lid or plastic wrap). Place the dough in the refrigerator to slowly rise until three hours before baking. Three hours before baking, remove the dough from the refrigerator and let it come to room temperature, keeping it lightly covered.
- 45-60 minutes before baking, move the rack to the lowest position in the oven (if the lowest rack in your oven is nearly touching the oven floor, move it up one notch - you don't want it that close or the bottom of the pizza will burn), place the pizza stone on it and preheat the oven to 500 degrees. Don't be nervous about a hot oven! I used to be scared to death to cook anything above 400 degrees but I promise 500 degrees is the only way to go when cooking pizza. If your oven is a bit sketchy at that temperature, bake at 475 degrees. Also,I think a pizza stone makes all the difference in good versus great pizza. I have this pizza stone and I love the rectangular shape. I have baked many a pizza on this stone and it is awesome.
- Here's a few different methods for making great pizza:
- Pizza Paddle/Peel: I have a wooden pizza paddle, like this, which I sprinkle with cornmeal and place the pizza dough on. I layer my toppings on the dough and slide the dough quickly onto the hot pizza stone. After about 8 or 9 minutes, the pizza is baked to perfection and I slide it onto a cutting board to slice and eat.
- Alternative Pizza Paddle/Peel: If you don't have a pizza paddle, you can use the underside of a baking sheet (I use an 11X17 size) or a large cutting board as a makeshift pizza paddle. Cover it lightly with cornmeal, flour or parchment paper, make your pizza on the floured baking sheet or cutting board and gently slide the pizza off of the makeshift paddle onto the baking stone when ready to bake (if using parchment paper, you can let the parchment paper slide onto the baking stone with the pizza). Bake for 8-9 minutes until the crust is nicely browned. Retrieve the pizza with a pair of tongs or a spatula and slide the baked pizza quickly onto a waiting cooling rack.
- Rimmed Baking Sheet: If you currently bake pizzas using cornmeal on a pizza paddle, you'll know how messy it can be - cornmeal everywhere. In fact, right now, my oven is in serious need of a good vacuuming. So, ofttimes, I'll still preheat my baking stone like normal and instead of using my wooden pizza paddle, I stretch the dough into an irregular shape on a lightly greased rimmed baking sheet (I don't worry about pressing it into the corners to give it a rustic look), add the toppings, and slide the entire baking sheet on the pizza stone to bake. Bake the pizza for 9-10 minutes until the crust is nicely browned. This method still browns the crust nicely - and while you don't get the extremely authentic pizza crust, it is still mighty delicious and I can make more pizza at once rather than sliding them one at a time onto the baking stone.
Subscribe to:
Posts (Atom)